Friday, July 07, 2006

Witches Broom

Witches Broom
from
http://www.aunt-em.com/kansas/tutorials/broom.html

Please read my **TERMS OF USE** before doing this tutorial.


Thanks! Auntie Em

This tutorial assumes you have a basic knowledge of the workings of Paint Shop Pro.


Bring up a blank image form, transparent background, size 300 X 500 pixels in size.
Floodfill with white.
Add a new raster layer.
Set your foreground pattern for a nice wood fill at 100%, angle 45. Background, null
Use your Draw Tool, size 10, curve tracking 6, with a rounded end line.
If you'd like a nice "crooked" handle on the broom, you could also use the Point to Point setting for the line.
Draw a line with a slight diagonal from near the top of the form to about two thirds down.
Naturally, if you'd like a longer handle on your broom, make your canvas size longer and draw a longer line.
The good part here is that the shakier you are, the better the handle looks. *LOL*

*ahem*....News Flash...Auntie Emerelda here.
I have been informed that, in order to make this broom more...umm...accomodating
for those of us with slightly larger than normal...ahh...derrieres,
the extra "flight deck length" mentioned previously would be in order.
Also...one must leave room for one's cat of course!
Thank you for pointing this out to me, Anneli! *g*

Go to: Effects > 3D Effects > Inner Bevel and use these settings on your handle:


Add a new raster layer.
Use your Draw Tool again for the broom itself.
Set your foreground to any dark patterned floodfill,
or you may use this seamless tile of mine if you wish, at 100%, angle 0.
Just right click to save it to your hard drive.


Begin with a Bezier Curve, width 1, and the rounded end line.
Make just a couple of bezier curves to kinda "outline" the edges of the broom.


These will just be a guideline for the rest of the filler lines you add freehand.
Switch to Freehand Line, or Point to Point if you'd rather, same settings as before, and begin to fill in the "strands" of the broom.
Begin drawing lines between your guidelines. Don't worry if they are not perfect....witch's brooms get a lot of use. *g*


Keep adding lines....now remember...not all straight ones....*LOL*...until your broom is nice and full.
You may want to add a new raster layer behind the broomstick to use to fill in some lines too and add a bit more depth.
Add a new raster layer above all the other layers.
Switch your foreground pattern to Bean Thing....I always wondered what I would use that pattern for! *ROTFL*
Zoom in twice to better see what you are doing here.
With your Line Tool set to Bezier Curve again, size 2, draw two curved lines where the broom attaches to the handle.
A bit lower, draw one curved line and two others in an X shape.


Add the same inner bevel to this layer with the lines, only changing the width to 3 and the depth to 1.
Alrighty, you're all done, unless you want to add a layer with text to give your broom a "name".
Just turn off your white background layer, merge visible layers, copy and paste as a new image and export as a tube!
Vroom...vroom! *g*


http://www.aunt-em.com/kansas/tutorials/broom.html
Lunch at the White house

http://www.101cookbooks.com/archives/001441.html

THIS IS NOT OF MY HAND, not created by me. I copied this from the internet site
http://www.101cookbooks.com/archives/001441.html

I place it here because more people should read about this... often people don't follow
or click on the link... I didn't ask the author's permission
but hope more people will read this. It certainly is interesting enough to repost.
I acknowledge the author and original link. Hey,
her husband was REALLY lucky, huh? Whitehouse luncheon.

Lunch at the White House


Wayne had lunch at the White House this week. I asked him to do a guest write-up about it.

On a recent trip to the Washington, D.C. area an old college friend who works at the White House graciously invited me to eat at the White House Mess in the West Wing, which is operated by the U.S. Navy. In honor of the holiday, here's brief look at this unique dining experience.

The relationship between food at the White House and the Navy dates back to 1880, when President Rutherford Birchard Hayes was traveling aboard the Presidential Yacht, Despatch. It is said that during this voyage the President noticed that the food the Navy cooking for him was significantly better than he ate at the White House.

During Franklin D. Roosevelt's administration in 1942 the Navy provided food for the retreat that was then known as "Shangri-La," which was later renamed Camp David. In 1951 Rear Admiral Robert L. Dennison recommended to President Truman that a commission officers mess be created in the White House. Since then the White House Mess has been located on the ground floor of the West Wing.

You are greeted by a young Naval officer in uniform who acts as host. He checks reservations and directs people to their tables. The decor of the lobby and dining hall is traditional and masculine - dark wood, thick leather, cannons blazing in paintings of naval battles by the artist William Phillips.

Down a set of stairs, the dining room is narrow, perhaps three modest-sized tables wide. It's not very big. The White House is of course a very professional environment. People are friendly, but very serious. Men wear jackets and ties and do not remove them during lunch. (The only sign of casualness was in the press room, where reporters and video technicians are camped out indefinitely.)


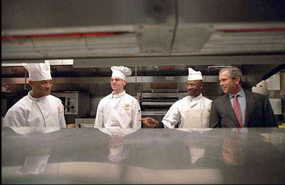
White House Photo by Eric Draper

The menu is traditional American; it includes the White House Signature Steak - Lone Star Cowboy, the West Wing Burger and the National Combo (smoked sausage, grilled onions and peppers on a roll served with a jumbo soft pretzel). There's even PB&J on the menu. The Herb Mustard Shrimp (jumbo shrimp sautéed in a mustard reduction sauce) was popular. Readers might be surprised that a good portion of the menu is "lite" - dishes with lower fat and calories. Choices for vegetarians like myself included a vegetable platter, a fruit salad, a personal pizza and spaghetti marinara. I was amused at the idea of having a veggie burger and fries at the White House.

While we snacked on rolls and butter (stamped with the Presidential Seal), there were not many conversations to overhear, as people spoke quietly, both out of privacy and a general sense of respect that was prevalent in the West Wing. Nobody could be seen using a cell phone, though there were several messages being read and written on Blackberries, which are ubiquitous amongst White House employees.

The service provided by the Navy is efficient and precise. The men serving you are smiling and gracious. The Mess is staffed well enough that even at the larger tables, multiple servers bring out plates, so that every diner's meal hits the table at the same moment. The veggie burger was standard fare (perhaps a Bocca or other similar product), though the roll was clearly freshly made and the waffle-cut fries were tasty.


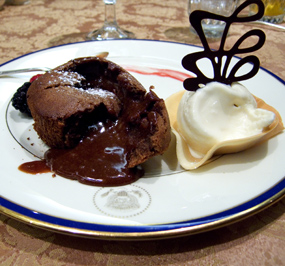
Chocolate Freedom

The highlight of the meal was the dessert of the day, the Chocolate Freedom, which had to be ordered with lunch because it took time to bake. When first served, it seems like a conservative desert - it's a small muffin-shaped cake served with homemade vanilla ice cream and fresh berries. But Chocolate Freedom is actually quite decadent - it's filled with gooey, molten chocolate, which probably keeps the staffers awake for days debating policy and strategy.

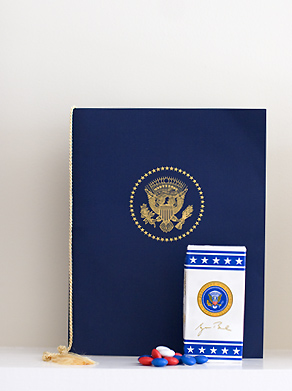
Exiting the White House Mess, the Navy tops its impeccable service by handing out little boxes of red, white and blue Presidential M&M's.

Luncheon at the Whitehosue

Found this at the 101 Cookbooks blog and thought it represented something that
needed to be reposted. THIS IS NOT OF MY HAND, not my origin, didn't ask
permission to reprint, but thought more people should read it so I place it here
and acknowldge the origin... (No telling how long the post will stand... hope it
remains for many years.)

http://www.101cookbooks.com/archives/001441.html

Boy, her husband was lucky. Wonder what it would be like...


Lunch at the White House

July 04, 2006 | by Wayne

Wayne had lunch at the White House this week. I asked him to do a guest write-up about it.

On a recent trip to the Washington, D.C. area an old college friend who works at the White House graciously invited me to eat at the White House Mess in the West Wing, which is operated by the U.S. Navy. In honor of the holiday, here's brief look at this unique dining experience.

The relationship between food at the White House and the Navy dates back to 1880, when President Rutherford Birchard Hayes was traveling aboard the Presidential Yacht, Despatch. It is said that during this voyage the President noticed that the food the Navy cooking for him was significantly better than he ate at the White House.

During Franklin D. Roosevelt's administration in 1942 the Navy provided food for the retreat that was then known as "Shangri-La," which was later renamed Camp David. In 1951 Rear Admiral Robert L. Dennison recommended to President Truman that a commission officers mess be created in the White House. Since then the White House Mess has been located on the ground floor of the West Wing.

You are greeted by a young Naval officer in uniform who acts as host. He checks reservations and directs people to their tables. The decor of the lobby and dining hall is traditional and masculine - dark wood, thick leather, cannons blazing in paintings of naval battles by the artist William Phillips.

Down a set of stairs, the dining room is narrow, perhaps three modest-sized tables wide. It's not very big. The White House is of course a very professional environment. People are friendly, but very serious. Men wear jackets and ties and do not remove them during lunch. (The only sign of casualness was in the press room, where reporters and video technicians are camped out indefinitely.)


White House Photo by Eric Draper

The menu is traditional American; it includes the White House Signature Steak - Lone Star Cowboy, the West Wing Burger and the National Combo (smoked sausage, grilled onions and peppers on a roll served with a jumbo soft pretzel). There's even PB&J on the menu. The Herb Mustard Shrimp (jumbo shrimp sautéed in a mustard reduction sauce) was popular. Readers might be surprised that a good portion of the menu is "lite" - dishes with lower fat and calories. Choices for vegetarians like myself included a vegetable platter, a fruit salad, a personal pizza and spaghetti marinara. I was amused at the idea of having a veggie burger and fries at the White House.

While we snacked on rolls and butter (stamped with the Presidential Seal), there were not many conversations to overhear, as people spoke quietly, both out of privacy and a general sense of respect that was prevalent in the West Wing. Nobody could be seen using a cell phone, though there were several messages being read and written on Blackberries, which are ubiquitous amongst White House employees.

The service provided by the Navy is efficient and precise. The men serving you are smiling and gracious. The Mess is staffed well enough that even at the larger tables, multiple servers bring out plates, so that every diner's meal hits the table at the same moment. The veggie burger was standard fare (perhaps a Bocca or other similar product), though the roll was clearly freshly made and the waffle-cut fries were tasty.


Chocolate Freedom

The highlight of the meal was the dessert of the day, the Chocolate Freedom, which had to be ordered with lunch because it took time to bake. When first served, it seems like a conservative desert - it's a small muffin-shaped cake served with homemade vanilla ice cream and fresh berries. But Chocolate Freedom is actually quite decadent - it's filled with gooey, molten chocolate, which probably keeps the staffers awake for days debating policy and strategy.

Exiting the White House Mess, the Navy tops its impeccable service by handing out little boxes of red, white and blue Presidential M&M's.

Tuesday, July 04, 2006

Halloween Party food

Halloween Party Food

  • Eyeballs – stuffed green olives, peeled grapes or peeled cheery tomatoes (bloody eyeballs)
  • Fingers – pickled Gherkins (Goblins), small red hotdogs
  • Moldy dip – color your favorite cheese dip with green food coloring or use guacamole
  • Worms – have a large bowl of spaghetti with your favorite tomato sauce
  • Witch's cauldron – hollow out a large round dark loaf of bread, leaving an inch of bread with the crust, and three quarter fill with your favorite dip. Invite guests to tear off pieces of the cauldron and dip into the center. You could also have a list of the ghoulish ingredients (eg frogs gizzards, snakes eyes, monster slime, bat blood etc).
  • Bat's wings – coat chicken wings with your favorite honey and soy sauce marinade, and add black food coloring (or a mixture of red, blue and green) to the mixture. Grilled under a griller they should be black and glossy.
  • Maggot casserole – add white long grain rice to your favorite casserole recipe.
  • Monster heads – cut the tops off green capsicums and scoop out the seeds and membrane. Fill with your favorite stuffing and bake until cooked. Use a little blue food coloring to make the stuffing look like brains. Insert two asparagus spears into the top as antennae, cut two holes and use stuffed olives for eyes, and cut a hole for a mouth, adding a piece of carrot for a tongue.
  • Moldy potato – add snipped chives and green food coloring to a bowl of mashed potato.
  • Tombstone cake – bake a chocolate cake in a bar tin and turn it upside down or level it so the top is flat. Ice it with white icing to resemble a tombstone. Make a headstone or cross from white cardboard and write RIP in red paint dribbling it down to resemble blood. Mold a hand out of fondant icing and have it coming up out of the grave.

Halloween Drinks

  • Bat punch – use black food coloring to darken your punch. If black food coloring is not available, red, blue and yellow mixed together will work almost as well.
  • Blood punch – make up a raspberry punch with red cordial and soda and add extra red food coloring. Float bones from a plastic skeleton on top. Peeled grapes can be floated in the punch as eyeballs.
  • Spooky ice cubes – freeze well-washed plastic bugs, beetles, spiders etc in ice cube trays and add to the punch. Raisins, sultanas and currents can be used instead of plastic bugs.


http://www.merrimysteries.com/tmm/partytips/halloween.htm#T1

Making Tombstones

Making Tombstones

http://www.fabulousfoods.com/cgi-bin/MasterPFP.cgi?doc=/holidays/halloween/tombstones.html


Making Tombstones
halloween decorations, tombstones

Note from Cheri:
Making realistic looking tombstone props for Halloween decorations isn't difficult or expensive, if you have a few simple tools and the right knowledge.

With the exception of the Mortuary sign above, the tombstones on this page were made using ordinary styrofoam. You can get this material at craft stores, but we found the prices were much cheaper at Home Depot (where they also had a great deal on blacklights). A woodburning tool, available in craft and toy stores, makes ultra-quick work of etching designs into the styrofoam (we couldn't, however, get ours to work on wood).

The Mortuary sign above, was made from foam rubber (the type used for upholstery). This was significantly more expensive and a bit trickier to work with with, but the final effect was fabulous.

These tombstones were designed and made by the talented team of Tim Holmes and Richard and Tracy Burnes.

halloween decorations, tombstonesIMPORTANT!!!!! Be sure to use acrylic spray paint only on these tombstones. Ordinary spray paint will disintegrate the styrofoam. Trust us, we learned the hard way.

For the Tombstones You Will Need:
sheets of styrofoam
serrated Knife or keyhole saw
wood burning tool
black acrylic spray paint
silver acrylic spray paint
dark green acrylic spray paint
hot glue gun (optional)

For the Mortuary Sign You Will Need:
large sheet up upholstery foam
scissors
serrated knife or electric knife
black acrylic spray paint
silver acrylic spray paint

For the Styrofoam Tombstones

Use a pencil to mark off the shape of your tombstone on a piece of styrofoam. Ours are between 2- 3 feet tall and between 18 - 32 inches wide. You can make plain shapes, like the top row middle photo, or add details like the tombstones on the left side (the shape details on the upper right and lower middle tombstones were added later to plain rectangular bases). If you're conservative, you can get several tombstones out of a single sheet. Smaller pieces and scraps can be used to add additional details, like the flower vase in the lower right stone or the carving on the upper right grave marker. We also made smaller tombstones out of scraps for a "pet cemetary," like the "Polly Choked on a Cracker" stone below.

Use a serrated knife or a keyhole saw to cut out the shape of your tombstone from a sheet of styrofoam (not shown). It's a good idea to do this step outside, because it does make a huge mess.

Once you've got a basic shape, it's time to add an epitaph and details. Use a pen or pencil to sketch the design, as in photo one below. Don't worry of you make mistakes, the paint will cover them, this guide is just for you. Use the heated wood burning tool to etch the design into the styrofoam. Since the tool instantly melts the foam, this step goes very quickly, almost like writing. The wood burning tool is also useful for making cutout designs (like in the "I Made an Ash of Myself" and "Great View" tombstones above).

Now is the time to add three-dimensional details to your stones, if you want them, using scraps of foam and a hot glue gun. Take a look at the two right hand tombstones above for inspiration.

halloween decorations, tombstoneshalloween decorations, tombstones

Take the etched tombstone outside or place on newspaper to protect surrounding surfaces (or both). Take the black acrylic spray paint and heavily go over the areas of the etchings (photo 3 below). Once of the etched area have been covered, give the entire surface of the tombstone a light coat of black paint.

Now take the can of silver paint, and holding it at a sideways angle, give the surface of the stone a light, patchy coat (photo 4 below). This is what gives the stones their granite-like appearance. Finally, spray on light patches of dark green paint to add the effect of age and moss, as in the finished stones above.

halloween decorations, tombstoneshalloween decorations, tombstones

To stand the stones on your lawn, cut two lengths of wire coat hanger wire, about 8 - 12 inches. Carefully push the two pieces of heavy wire into the styrofoam base of the stones, halfway. Push the other half of the wires into soft grass.

For the Mortuary Sign

halloween decorations, tombstonesThis sign was made from upholstery foam. After using a serrated or electric knife to cut out the basic outer shape, the remaining portions were cut with ordinary scissors. A light coating of the paint techniques outlined above, minus the green moss (although you could use it) gave us the look we going for.

halloween decorations, tombstones halloween decorations, tombstones


Saturday, July 01, 2006

Pumpkin Costume

from...

PUMPKIN COSTUME


Tools and Materials
3 packages (20-by-90-inch) sheet crepe paper in orange
1 package (20-by-90-inch) sheet crepe paper in black
Scissors
Floral wire
Thread, in orange and black
Sewing machine
White tissue paper, for stuffing
Seam binding, or ribbon, in orange and black
Craft glue
Black rickrack
1 roll green crepe-paper streamer
Pencil
CUTTING THE PIECES
1. Using bodice template (as indicated for pumpkin costume) enlarged to 200 percent, cut out two front pieces and four back pieces from orange crepe paper.
2. Cut four 20-by-44-inch rectangles of orange crepe paper. These will be used to create the pumpkin shape.
3. Cut four 4-inch-wide strips crosswise from the folded black crepe paper. These will be used for the skirt (illustration 1).


4. Using a template, cut out the nose, eyes, and mouth for the pumpkin’s face.
5. Cut a 20-by-22-inch piece of orange crepe paper and a 1/2-inch-by-36-inch strip of green crepe-paper streamer, for hat.
6. Snip a length of floral wire to 12 inches.
SEWING THE BODY
1. With a 1/4-inch seam allowance, machine-stitch the two bodice front pieces to two layers of the 20-by-40-inch crepe-paper rectangles (illustration 2). Start at one side, and gather the paper to accommodate for the shorter length of the bodice piece as you stitch.


2. Continue gathering and stitching around the armholes, shoulders, and neckline, and down the other side of the bodice.
3. Trim excess gathered paper from around armholes, leaving excess at neck intact (illustration 3).
4. Gather crepe paper at the bottom edge until it is the same width as the bottom of the bodice front, and stitch in place leaving a 4-inch opening for stuffing (illustration 4).


5. Stuff the body front with white tissue paper, and sew up the bottom seam. Set stuffed pieces aside.
6. Measure down 3 1/2 inches from center neck of bodice back, and snip a 1/4-inch notch. Then, using a 1/2-inch seam allowance, stitch the four back bodice pieces together, starting below the notch. Fold seams open (illustration 5).


7. Repeat Steps 1 through 5 with back bodice pieces, except when gathering and stitching around the center back seam cut a slit to accommodate the opening in the back of bodice. Sew around slit to close.
8. Glue eyes, nose, and mouth to pumpkin front.
MAKING THE PLEATED SKIRT
1. Fold a series of 1-inch pleats at 1/4-inch intervals in each of the 4-inch-wide strips of black crepe paper (illustration 6).


2. Align two pleated rectangles with bottom edges of the pumpkin front (illustration 7); cut off excess width of rectangles.


3. Center a 28-inch length of black seam binding over the top edge of the pleats, and edge-stitch along top and bottom, as shown (illustration 7). This will be the skirt front.
4. Repeat steps 1, 2, and 3 with remaining pleated rectangles to create the skirt back.
5. Center the skirt front on the bottom edge of the pumpkin front, leaving ends of seam binding free. Stitch skirt front to pumpkin front. Repeat with skirt back and pumpkin back.
STITCHING THE TIES AND SHOULDER SEAMS
1. Cut six 7-inch ties from orange seam binding. Stitch one tie to each side under the arms and to each side of back neck opening. Use these ties to hold costume closed once it is on the child.
2. Stitch pumpkin front to pumpkin back at shoulder seams.
MAKING THE HAT
1. Fold the 20-by-22-inch orange rectangle in half lengthwise.
2. Fold in half crosswise but don’t crease; with a 1/2-inch seam allowance, stitch to create a cylinder (illustration 8). Turn right side out.


3. Stitch a 21-inch length of rickrack along the inside of the folded edge. Then, stitch a 22-inch length of black seam binding along the outside edge (illustration 9), overlapping 1/2 inch.
4. Measure 3 inches down from the top of the cylinder. Gather at the 3-inch mark (illustration 10), and tie with thread. Taper this stem by cutting downward at an angle, as shown.


5. Insert the length of wire into the top of the stem. Bind the stem by gluing one end of the strip of green crepe paper to the base and then wrapping upward (illustration 11). Pull the paper taut as you wrap. After wrapping the stem, continue up the length of wire until it is covered, and glue at the end.


6. Coil the covered wire around a pencil (illustration 12). Remove pencil.
Other Costumes
Spider Princess Costume
Cat-Girl Costume
PRINTABLE FILES
We offer the downloadable file in a portable document format, or PDF, in order to make the details clear and printable. To view and print the file, you need a program called Adobe Acrobat Reader, which most browsers already include. If you have trouble downloading the file, or if you’d like an upgrade, you can obtain the software for free from Adobe’s website.